VLAN
Note
Images of GS1024E are for reference only; details may vary by model.
VLAN (Virtual Local Area Network) is a network technique that solves broadcasting issues in local area networks. It is usually applied in the following occasions:
- To restrict broadcast domain: VLAN technique divides a big local area network into several VLANs, and all VLAN traffic remains within its VLAN. It reduces the influence of broadcast traffic in Layer 2 network to the whole network.
- To enhance network security: Devices from different VLANs cannot achieve Layer 2 communication, and thus users can group and isolate devices to enhance network security.
- To facilitate management: VLANs group devices logically instead of physically, so devices in the same VLAN need not be located in the same place. It eases the management of devices in the same work group but located in different places.
There are 4 types of VLAN modes supported on the switch:
- MTU VLAN defines an uplink port which will build up several VLANs with each of the other ports. Each VLAN contains two ports, the uplink port and one of the other ports in the switch, so the device connected to the uplink port can communicate with the device connected to any other port, but devices connected to other ports cannot communicate with each other.
- Port-Based VLANs are divided based on ports. In port based VLAN mode, each port can only be added to one VLAN.
- 802.1Q VLAN protocol defines a new format of VLAN data frame (Tagged Frame). As the following figure shows, compared to the traditional Ethernet data frame (Untagged Frame), the VLAN data frame (Tagged Frame) adds a VLAN tag.
- Voice VLAN is dedicated specifically for IP phone traffic, often prioritizing it (via QoS) and separating it from data traffic for better quality and security. Typically uses 802.1Q tagging 3. Configured by enabling Voice VLAN on an access port, setting the Voice VLAN ID, and often using LLDP for auto-provisioning phones.
Note
- The switch works in one and only one VLAN mode at any time. When a specific VLAN mode is enabled, the other two VLAN modes will be disabled automatically and the corresponding VLAN configuration will be lost.
- The switch supports up to 32 VLANs simultaneously.
MTU VLAN
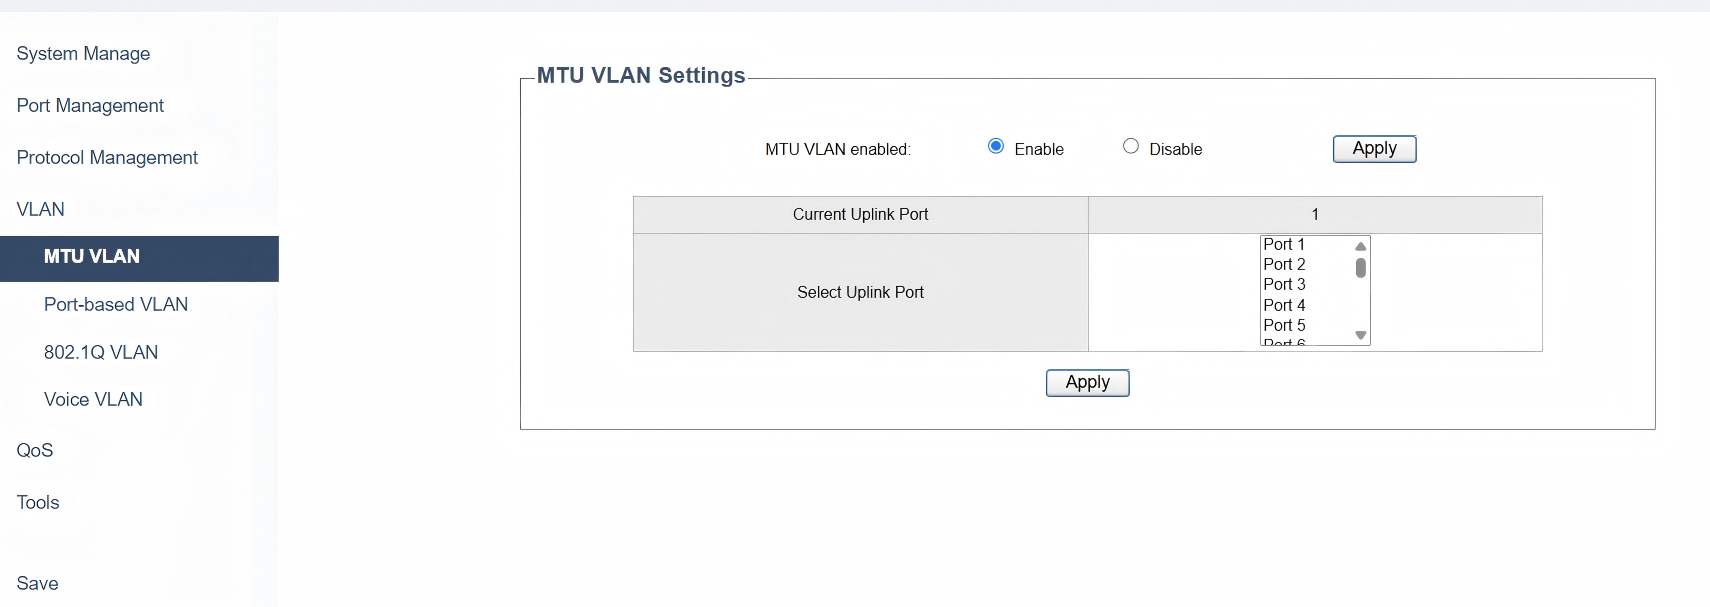
On the VLAN >> MTU VLAN page, please follow the steps to configure it:
1) Select to Enable MTU VLAN mode, and click Apply.
2) Select from the list to change the uplink port according to your need. Click Apply.
- Current Uplink Port displays the port that currently connects to the uplink and it will refresh and update as you change it.
- The uplink port will build up several VLANs with each of the other ports.
Note
MTU VLAN is disabled by default; and when it is enabled, 802.1Q VLAN and Port-based VLAN will be disabled automatically.
Port-based VLAN

On the VLAN >> Port-based VLAN page, please follow the steps to configure it:
1) Select to Enable Port-based VLAN, and click Apply.
2) Enter the VLAN ID and select Port(s) to be added to the VLAN by Enabling the checkbox of Member. Click Apply. To delete the VLAN created, enter the corresponding VLAN ID and click Delete.
3) Verify the configuration result of the port-based VLAN in the table below.
- VLAN displays the ID number of VLAN.
- Member Port displays the member ports in the VLAN.
Note
- By default, all the ports are added to VLAN 1.
- Once a port is added to another VLAN, it is deleted from the original VLAN automatically.
- Once a port is removed from all the other VLANs, it is added to VLAN 1 automatically.
- VLAN 1 includes at least one port and cannot be deleted.
802.1Q VLAN
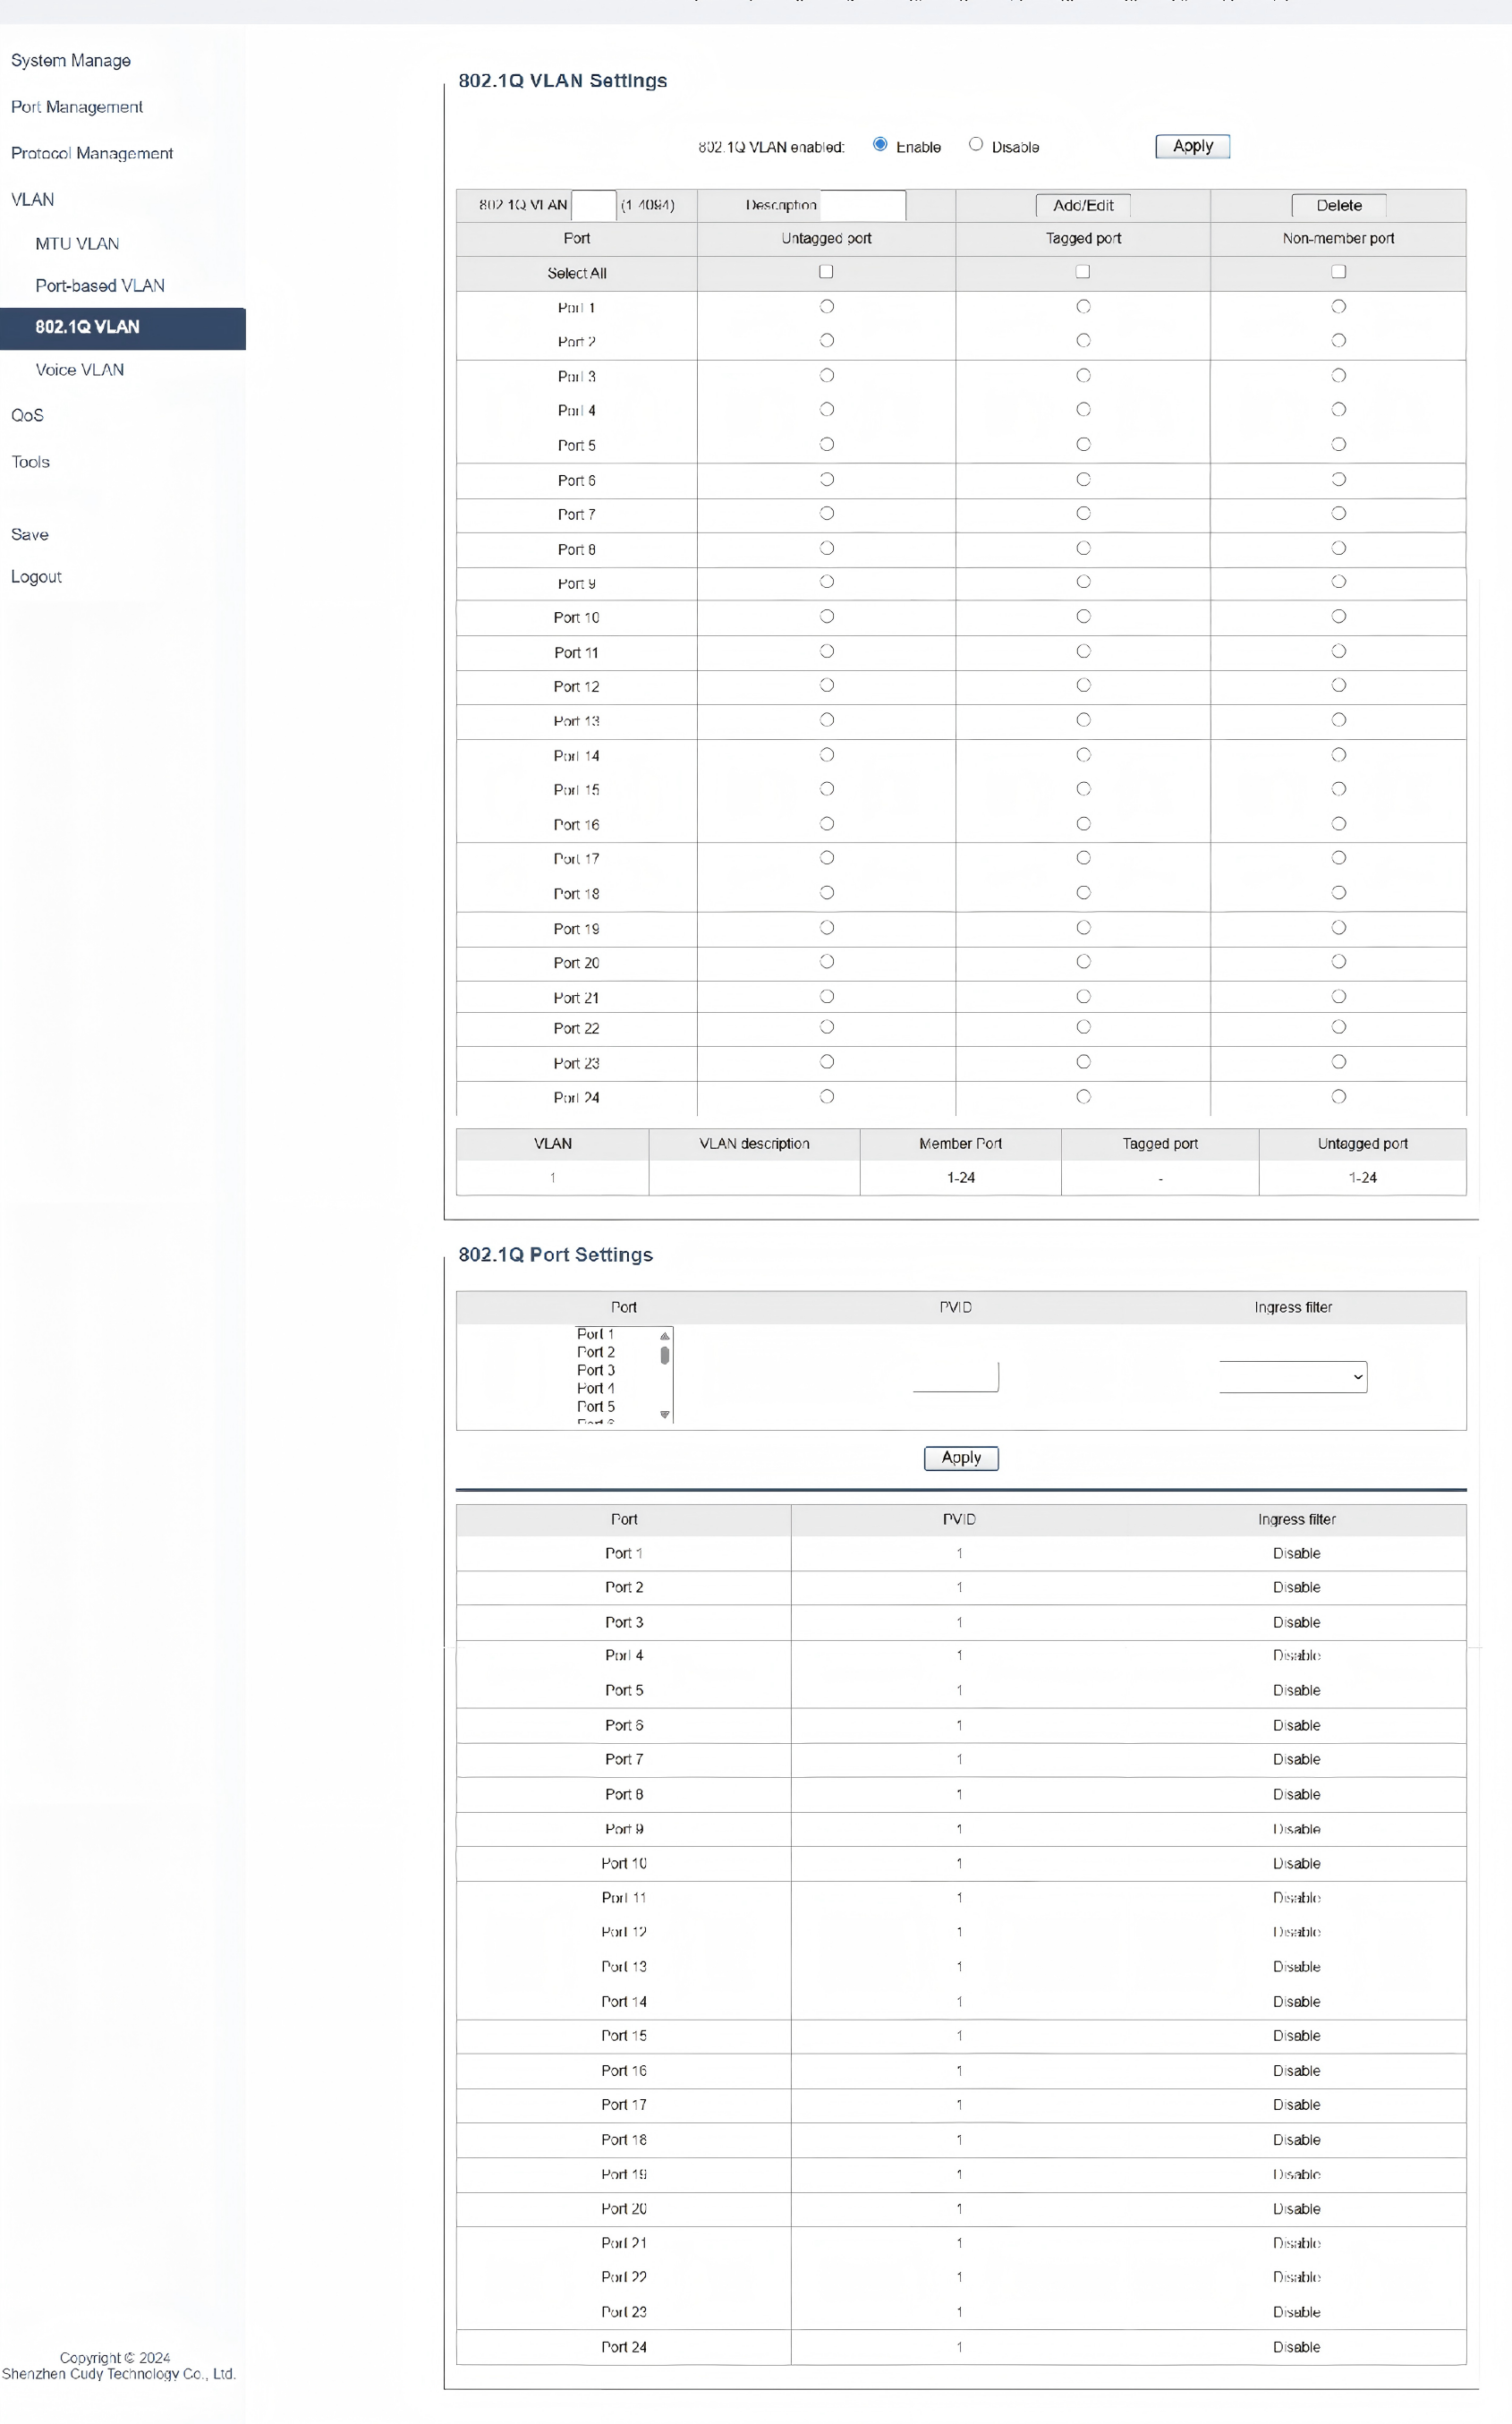
On the VLAN >> 802.1Q VLAN page, please follow the steps to configure it:
1. Configure the 802.1Q VLAN.
1) Select to Enable 802.1Q VLAN, and click Apply.
2) Enter a 802.1Q VLAN ID and a brief description to identify the VLAN. Select the untagged port(s) and the tagged port(s) respectively to be added to the created VLAN based on the network topology. Click Add/Edit. To delete the VLAN created, enter the corresponding VLAN ID and click Delete.
- 802.1Q VLAN: Enter a VLAN ID, ranging from 1 to 4094.
- Description: Give a brief description for the VLAN.
- Set the port as an untagged port, a tagged port or a non-member port in the VLAN.
- Untagged port: Click the checkbox to configure the egress rule of the traffic on this port as untagged. The switch drops the tag header before sending the packet.
- Tagged port: Click the checkbox to configure the egress rule of the traffic on this port as tagged. The switch adds the tag header before sending the packet.
- Non-member port: Click the checkbox to exclude the port from the current VLAN.
3) Verify the configuration result of the 802.1Q VLAN.
Note
- By default, all the ports are added to VLAN 1.
- The port can be removed from VLAN 1 only when the port is also a member of the other VLANs.
- Once a port is removed from all the current VLANs, it is added to VLAN 1 automatically.
- VLAN 1 cannot be deleted.
2. Configure the 802.1Q Port.
1) Select the ports, set the PVID for the ports, and choose to enable or disable Ingress Filtering. Click Apply.
- PVID: Enter the default VLAN ID for the port. It can be added to the untagged packets as VLAN ID, and then the port will forward the packets in the corresponding VLAN.
- Ingress Filter: Select to Enable or Disable to filter incoming traffic based on VLAN membership.
2) Verify the configuration result of the 802.1Q Port.
Note
- The PVID configuration will take effect only when 802.1Q VLAN mode is enabled.
- You can specify a PVID only when the corresponding VLAN exists.
Voice VLAN
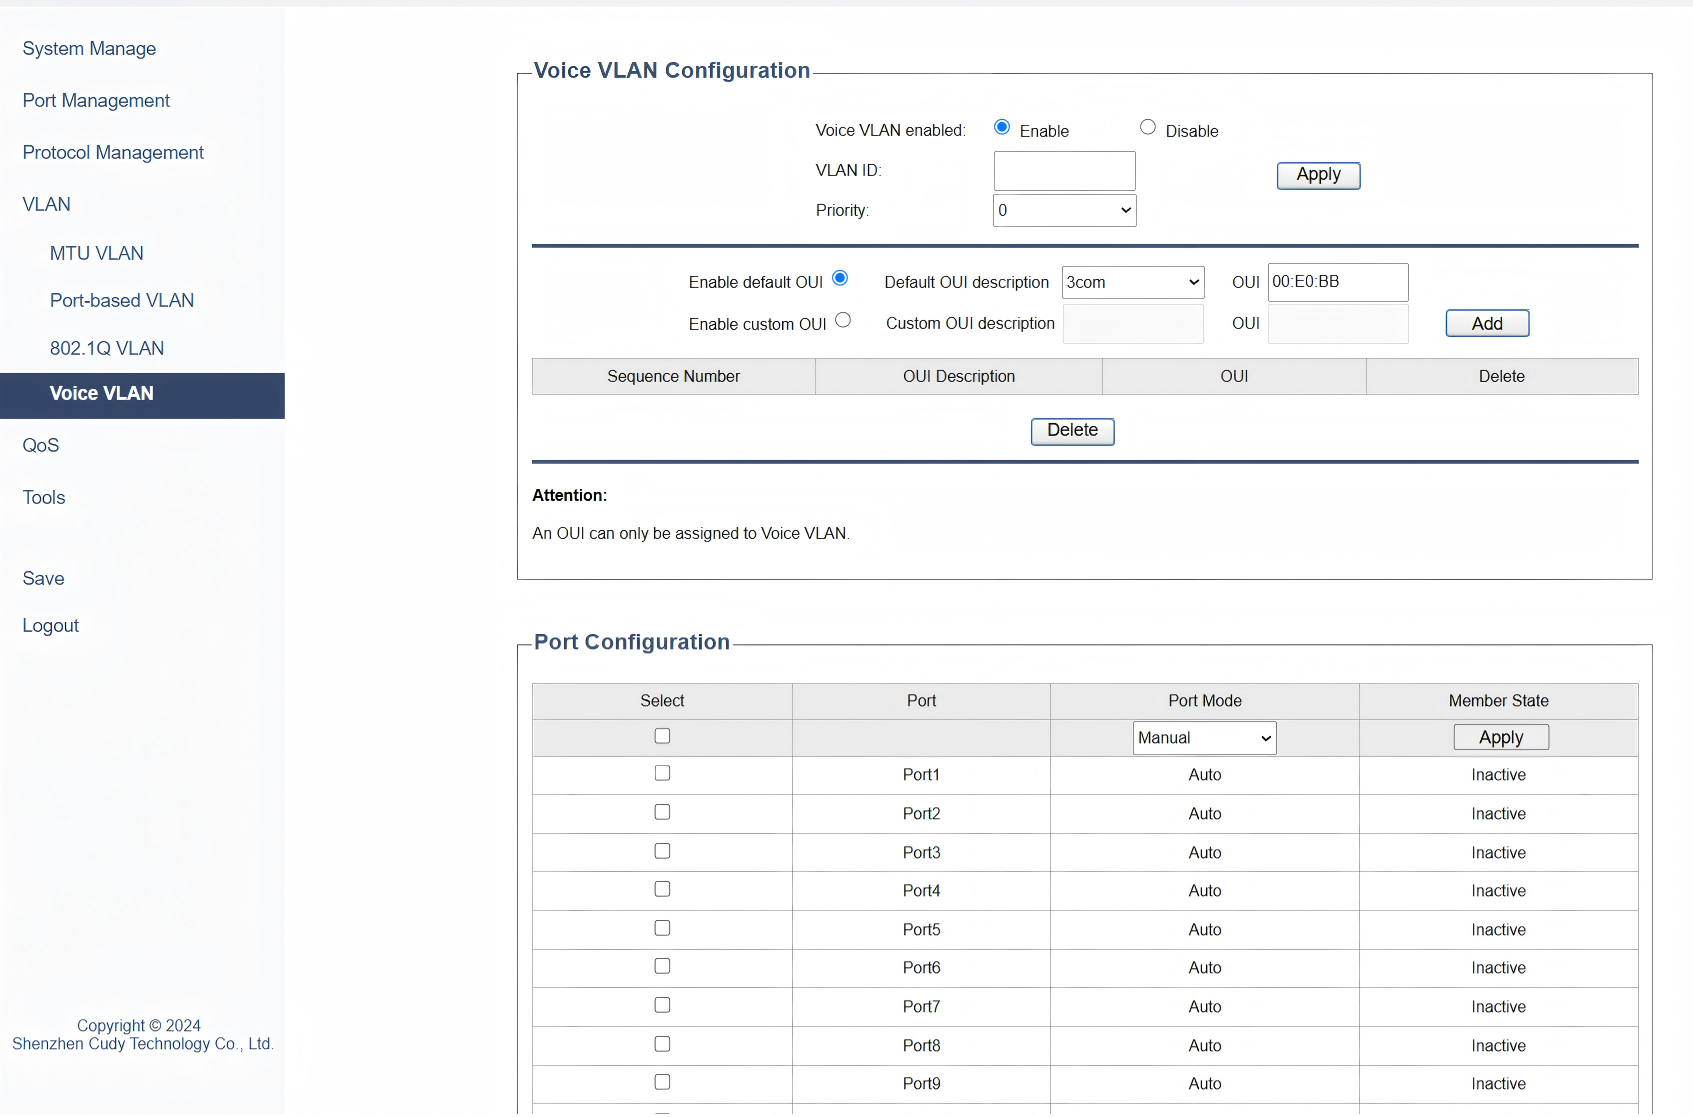
On the VLAN >> Voice VLAN page, please follow the steps to configure it:
1. Configure the Voice VLAN.
1) Select to Enable Voice VLAN. Click Apply.
2) Enter a VLAN ID and select a priority number for it. Click Apply.
3) Select to Enable default OUI or Enable custom OUI, and then set the OUI description and address of your voice device. Click Add.
4) Verify the configuration result. If needed, you can select the entry to Delete it.
Note
- An OUI can only be assigned to Voice VLAN.
2. Configure Port.
1) Select the Port to be configured.
2) Select port mode to be manual or automatic.
3) Set the Member State of a port in a VLAN to inactive.
4) Click Apply.
Note
- Voice VLAN is disabled by default; 802.1Q VLAN needs to be enabled first before Voice VLAN.