General Settings
PON WAN
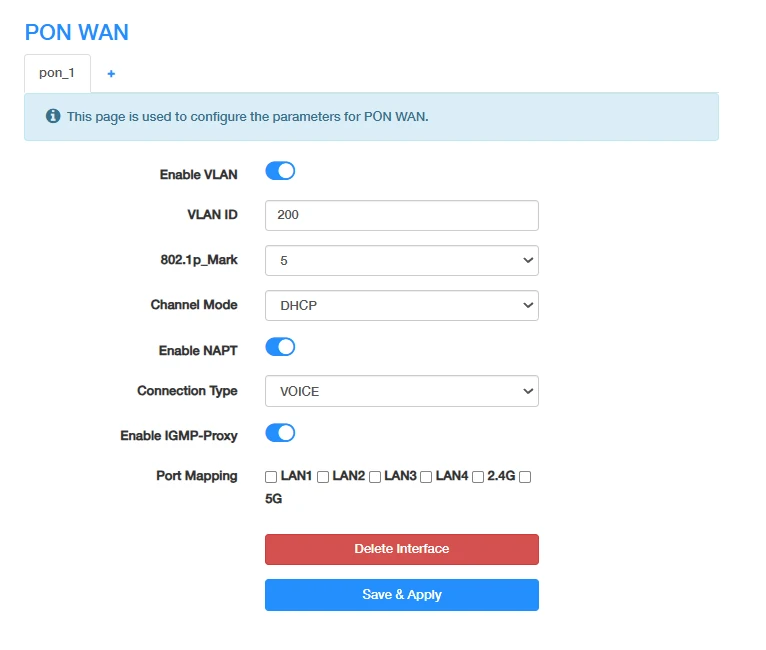
- Select the existing interface (e.g., pon_1) or click + to add a new WAN interface.
-
Configure the following parameters:
- Enable VLAN: Enable or disable VLAN tagging for the WAN interface.
- VLAN ID: Enter the VLAN ID provided by your ISP. This option is available when VLAN is enabled.
- 802.1p_Mark: Select the 802.1p priority value for the WAN traffic, as specified by your ISP.
- Channel Mode: Select the WAN connection mode, such as DHCP or another available mode, according to your ISP's requirements.
- Enable NAPT: Enable or disable Network Address and Port Translation (NAPT) for the WAN interface.
- Connection Type: Select the service type, such as INTERNET, IPTV, or VOICE, depending on the available options and your ISP's configuration.
- Enable IGMP-Proxy: Enable IGMP Proxy if required for IPTV multicast services.
- Port Mapping: Select the LAN ports and Wi-Fi bands (2.4G/5G) to associate with this WAN interface.
-
Click Save & Apply to save and apply the settings. Or select it and click Delete Interface to remove an existing WAN interface.
Note
- The WAN parameters, including VLAN ID, 802.1p priority, connection mode, and service type, should be configured according to your ISP's requirements. Incorrect settings may prevent the WAN interface from connecting properly.
- Before configuring a PON WAN interface, make sure you have obtained the required WAN parameters from your ISP. If you are unsure about any settings, contact your ISP before making changes.
PON Auth
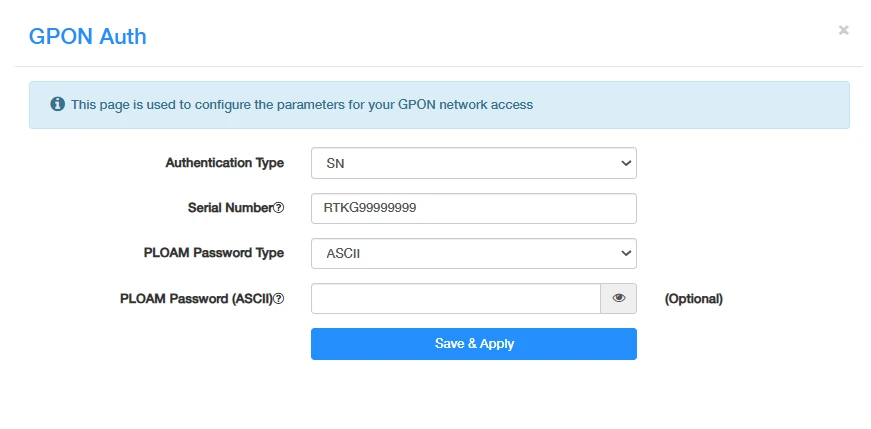
-
Configure the following parameters:
- Authentication Type: Select the authentication method required by your ISP, such as LOID or SN authentication.
- Serial Number: Enter the PON serial number provided by your ISP. This field is used for SN-based authentication.
- PLOAM Password Type: Select the password format, such as ASCII or HEX, according to your ISP's requirements.
- PLOAM Password (ASCII): Enter the PLOAM password provided by your ISP in ASCII format. This field is used for PLOAM-based authentication.
-
Click Save & Apply to save and apply the settings.
- Wait for the device to complete PON registration.
Note
- Obtain the authentication information from your ISP before configuring these settings.
- Make sure the authentication type and credentials match your ISP's requirements. Incorrect information may prevent the device from registering with the PON network.
Wireless
Wireless is to customize the router's wireless settings, including SSID and password, mode, channel, channel width and transmit power, and so on.
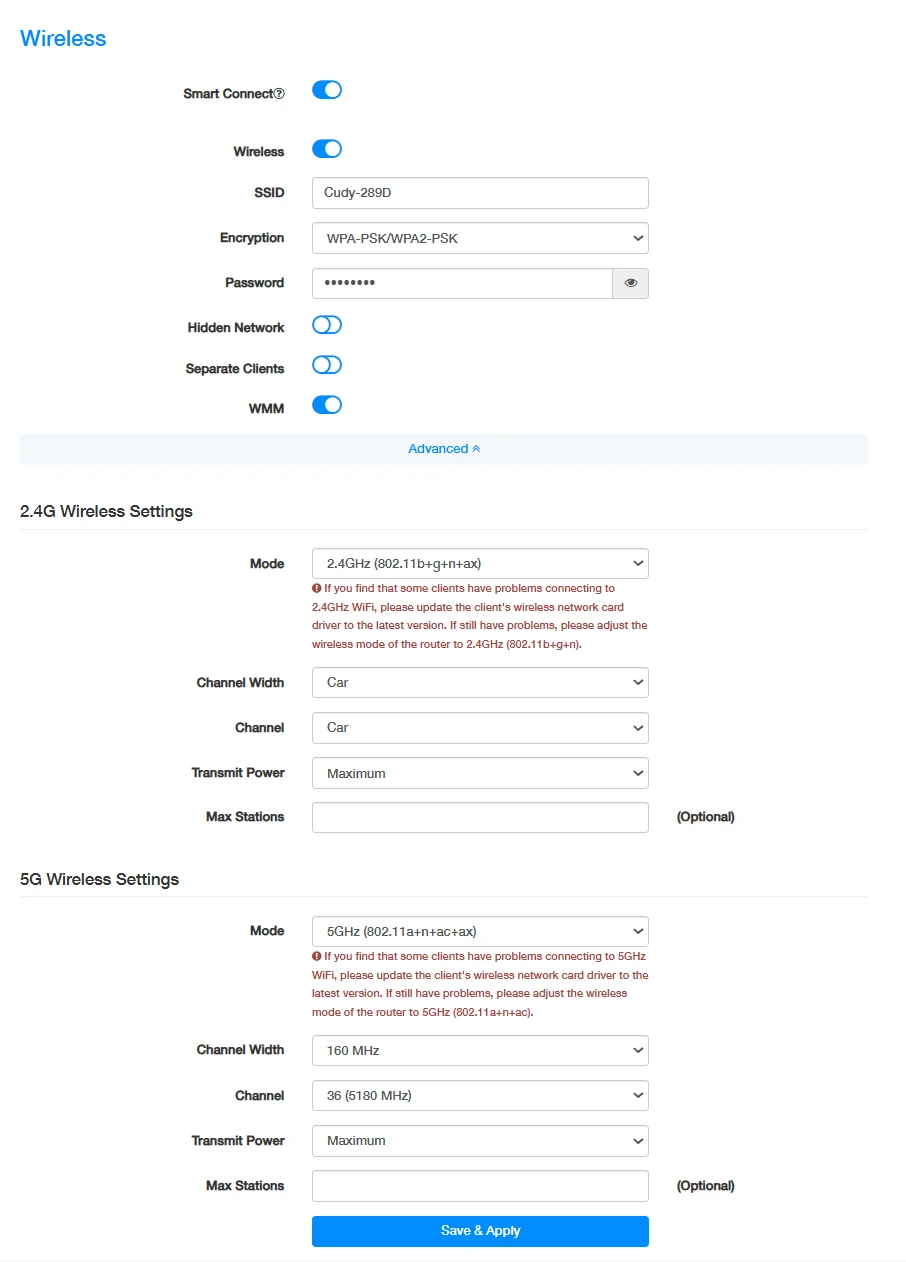
- Enable Smart Connect as needed.
- Enable Wireless.
- Configure the following settings together if enabled Smart Connect or separately if didn't enable Smart Connect.
- Customize your SSID (wireless network name);
- Select a strong Encryption;
- Create a secure password;
- Enable Hidden Network if you don't want your SSID to display automatically. Then you need to manually join the network.
- Enable Separate Clients if you want to isolate the wireless clients from each other.
- Enable WMM as is recommended for better Wi-Fi performance.
- Click Advanced if necessary to configure Mode, Channel Width, Channel, Transmit Power and Max Stations.
- Click Save & Apply to apply your new settings.
Guest Network
Guest Network provides separate Wi-Fi access for guests while keeping your main network private. Follow the steps below to configure it.
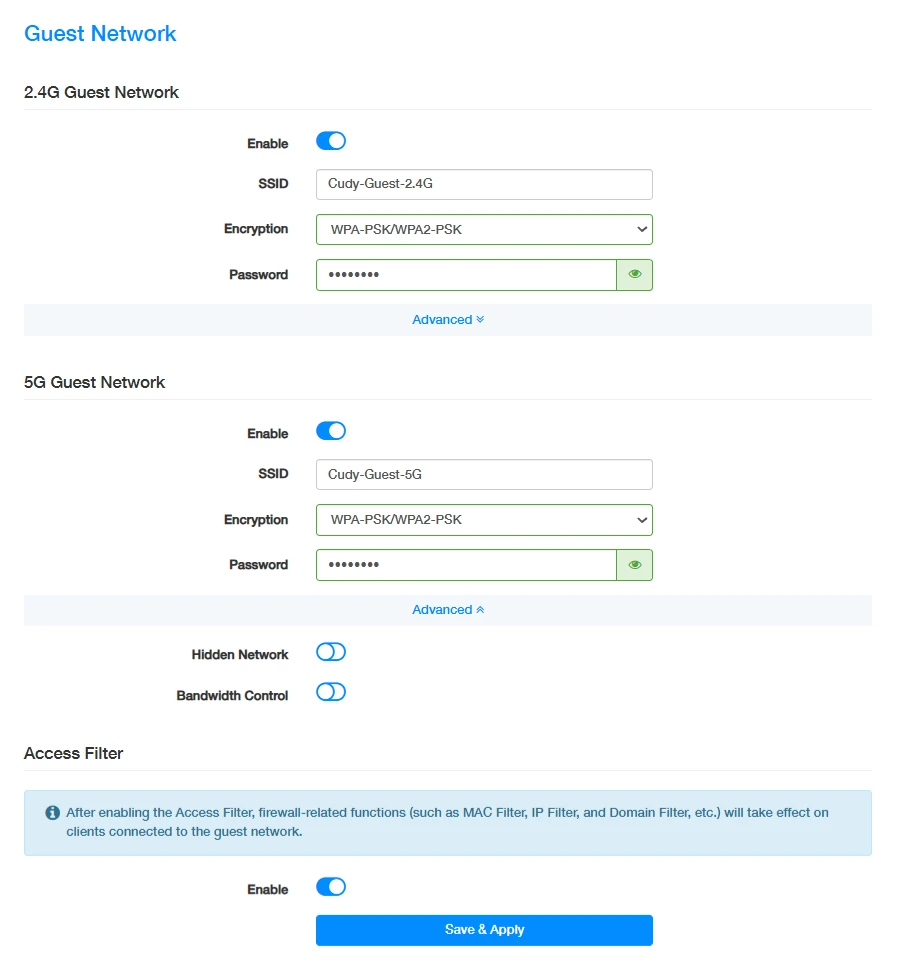
- Enable 2.4G Guest Network / 5G Guest Network.
- Customize the SSID, select an Encryption and set a password.
- Don't enable Hidden Network unless you want your guests to manually input the SSID for guest network access.
- Don't enable Bandwidth control unless you want to limit the bandwidth available to guest devices and reserve more bandwidth for your main network.
- Download Bandwidth: Set the maximum download bandwidth available to the guest network.
- Upload Bandwidth: Set the maximum upload bandwidth available to the guest network.
- Enable Access Filter as needed. If enabled, the firewall-related functions (such as MAC filter, IP filter, and domain filter, parental control, etc.) will take effect on clients connected to the guest network.
- Click Save & Apply.
EasyMesh
EasyMesh allows you to connect multiple compatible routers or extenders to form a unified Wi-Fi network, extending wireless coverage and enabling seamless roaming between Mesh devices.
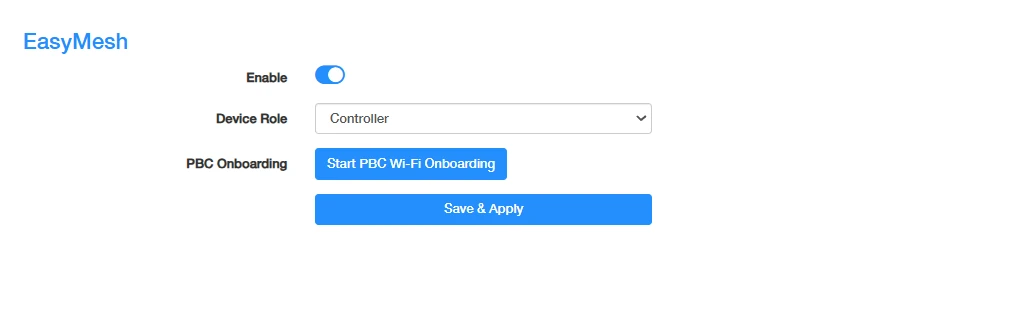
- Enable EasyMesh.
- Set Device Role to Controller. Click Save & Apply to save and apply the settings.
- Click Start PBC Wi-Fi Onboarding to start the pairing process.
- Initiate PBC pairing on the Agent device.
- Wait for the pairing process to complete.
Note
- Both the Controller and Agent must support compatible EasyMesh functionality.
- Keep the devices close to each other during pairing.
- PBC onboarding may time out. If pairing fails, restart the onboarding process.
- The available pairing methods and procedures may vary depending on the device firmware.
Firmware
Firmware allows you to check the current firmware version or upgrade the router firmware to the latest version. Choose from three available firmware update methods.

-
Auto Update: Enable Auto Update, specify the Update Time and click Save & Apply. Then the router will automatically update firmware to the latest version at the specified time.
-
Online Update: Click Check for update. If there is one, click Update and wait a few minutes for the update and reboot to complete.
-
Local Update: Click Browse... to locate and upload the latest firmware file you've downloaded from www.cudy.com. Wait a few minutes for the update and reboot to complete.
Note
- Backup your router's configurations before firmware update.
- Do NOT turn off the router during the firmware update.
- If you fail to update the firmware for the router, please contact our technical support.