VPN
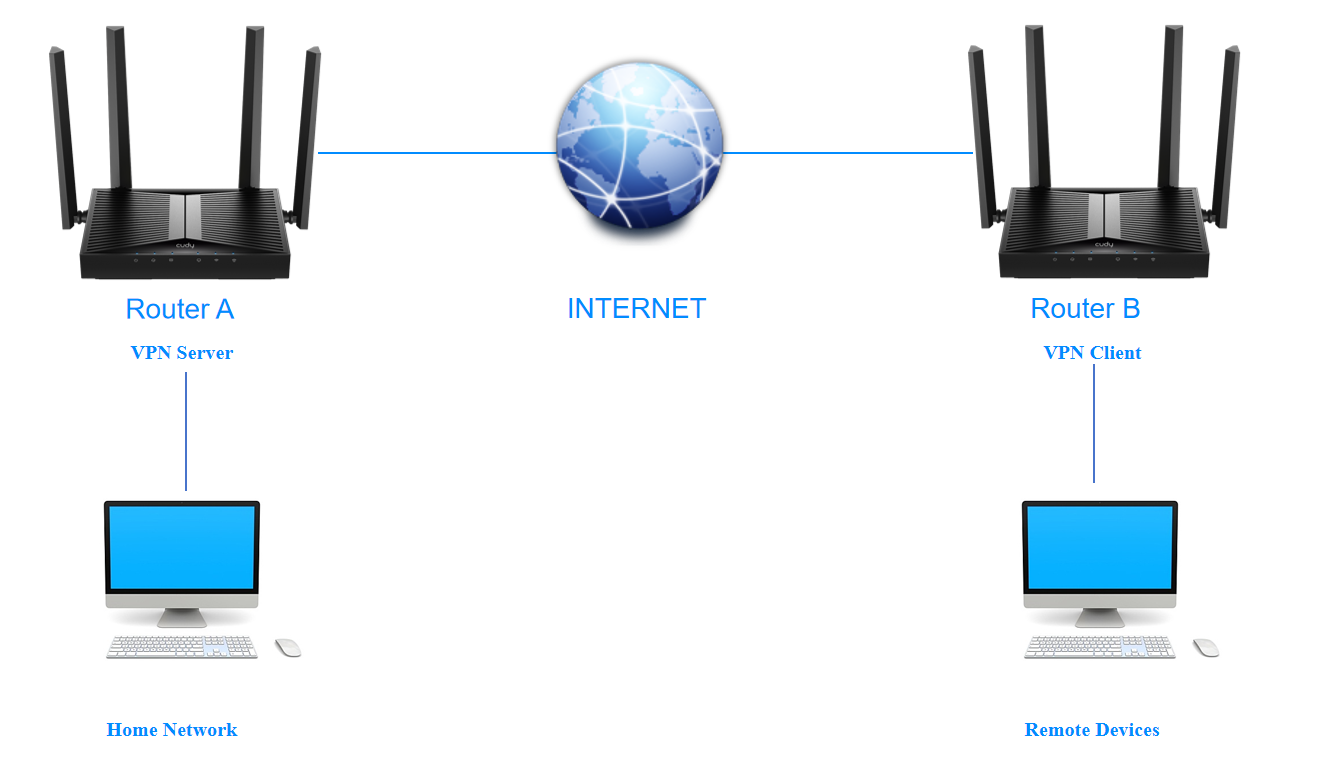
VPN (Virtual Private Network) helps you access Internet resources remotely, securely, and privately through tunneling technology. When you access the Internet, VPN encrypts your personal information and hides your IP address from the public. For VPN users, it looks like the devices are directly connected. Cudy Router supports 6 types of VPN connections: PPTP, L2TP, OpenVPN, WireGuard, ZeroTier, IPSec (site-to-site). Please choose an appropriate VPN according to your needs and circumstances.
Note
Before you enable VPN Server, it is recommended to configure Dynamic DNS Service or assign a Static IP Address for router’s WAN port and synchronize your System Time with Internet.
PPTP VPN
PPTP VPN is used to create a PPTP VPN connection for remote devices to access your home network. Fast connection/disconnection and simple configuration satisfy the needs for users who is apt to frequently switch VPN environments. Please follow the steps below to set up a PPTP VPN connection.
STEP 1. Configure the PPTP Server on Router A:
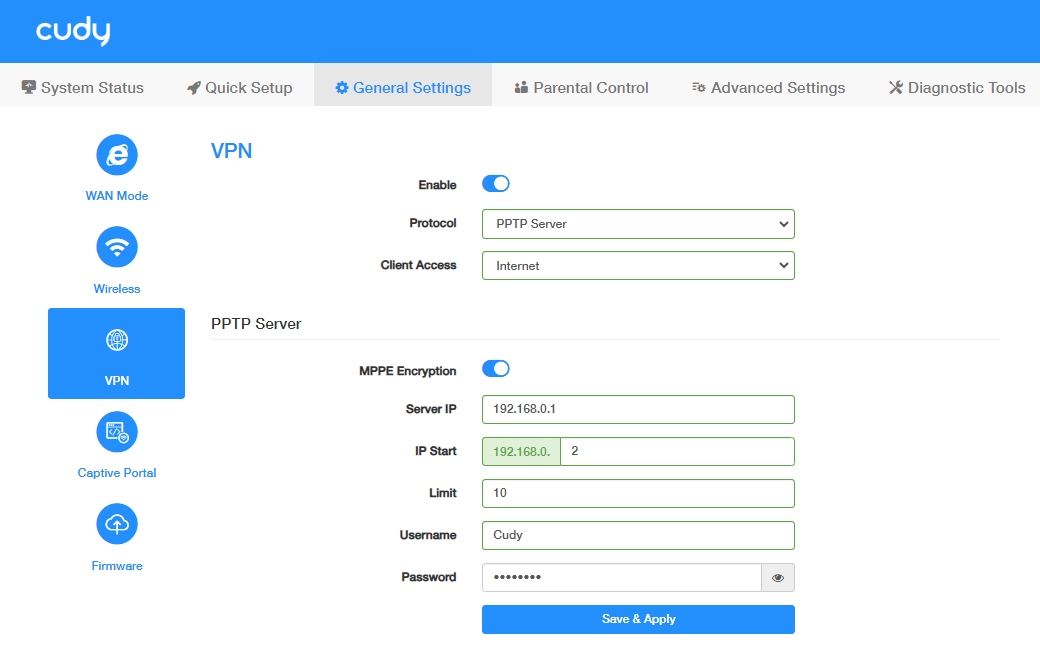
- Log into the Router A’s management web page https://cudy.net (or 192.168.10.1).
- Go to General Settings ->VPN. Enable VPN, and select PPTP Server as Protocol.
- Select Client Access (Internet and Local Network/Internet/Local Network).
-
Configure the PPTP Server.
- MPPE Encryption: Enable to encrypt the data transmitted via PPTP VPN, thus improve the communication security.
- Server IP/IP Start/Limit: Set to assign IP address for the VPN Clients.
- Username/Password: Set for the VPN client to access the VPN Server.
-
Click Save & Apply.
STEP 2. Configure PPTP Client on Router B:
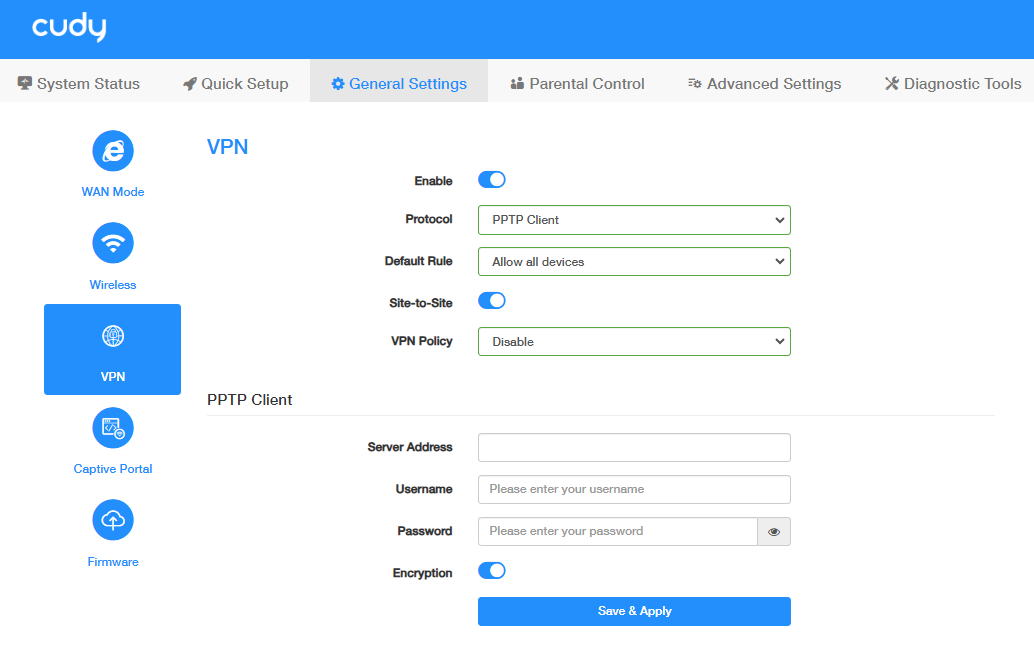
- Log into the Router A’s management web page https://cudy.net (or 192.168.10.1).
- Go to General Settings ->VPN. Enable VPN, and select PPTP Client as Protocol.
- Select Allow all devices or Ban all devices as Default Rule.
- Enable Site-to-Site to allow communication between VPN server and Clients.
-
Select VPN Policy.
- Disable: VPN Policy is disabled. No restriction.
- VPN kill switch: Internet access will be disconnected upon VPN disconnection. It is highly recommended for users who transmit data all through VPN. Preferred (and optionally Alternate DNS) is required.
- Domain: Select and configure to allow specified domain(s) to transmit data through VPN or not. DNS and Domain are required.
- Remote Subnet: Select and configure to allow devices with the specified subnet to transmit data through VPN. IP address and Subnet mask are required.
-
Configure the PPTP Client:
- Server Address/ Username/Password: Enter the parameters provided by the PPTP Server.
- Encryption: Enable to ensure the data security for the PPTP clients.
-
Click Save & Apply.
L2TP VPN
L2TP VPN Server is used to create a L2TP VPN connection for remote devices to access your home network. Compared with PPTP, L2TP supports multi-tunnel with authentication between two endpoints, thus users can set up different tunnels with various service quality. Please follow the steps below to set up a L2TP VPN connection.
STEP 1. Configure the L2TP Server on Router A:
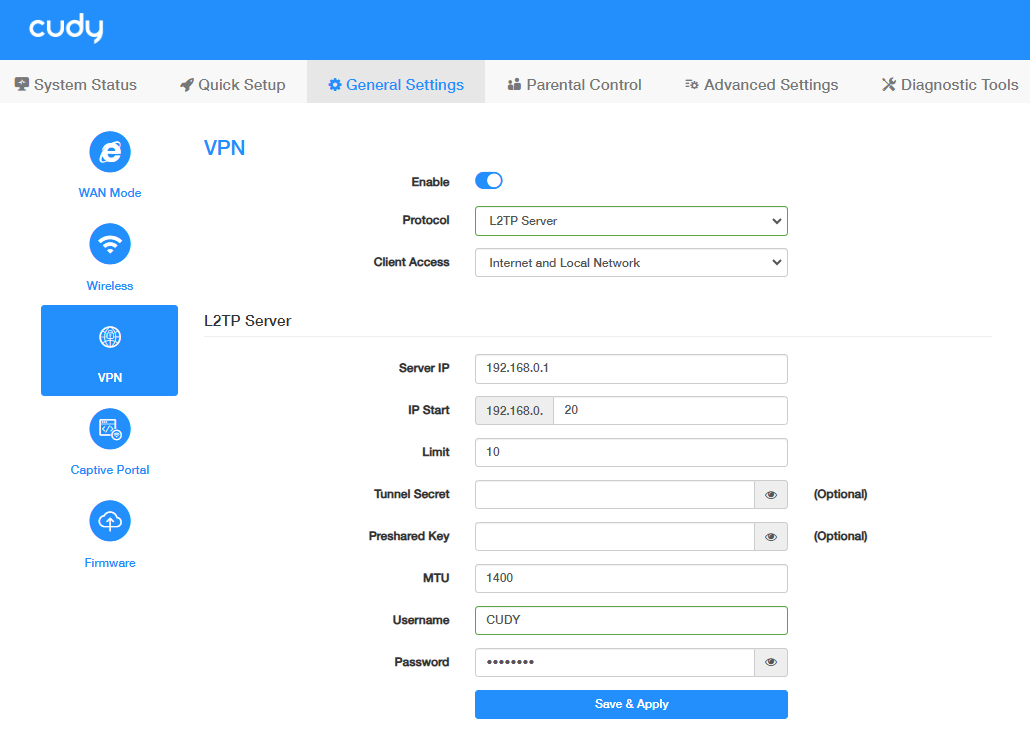
- Log into the Router A’s management web page https://cudy.net (or 192.168.10.1).
- Go to General Settings ->VPN. Enable VPN, and select L2TP Server as Protocol.
- Select Client Access (Internet and Local Network/Internet/Local Network).
-
Configure the L2TP Server.
- Server IP/IP Start/Limit: Set to assign IP address for the VPN Clients.
- Tunnel Secret (Optional): To set a L2TP VPN encryption as needed.
- Preshared Key (Optional): To set a IPSec encrytion as needed.
- MTU: Maximum Transmission Unit is 1400 by default. You may change it if necessary.
- Username/Password: Set to authenticate the VPN clients to access the VPN Server.
-
Click Save & Apply.
STEP 2. Configure L2TP Client on Router B:
- Log into the Router A’s management web page https://cudy.net (or 192.168.10.1).
- Go to General Settings ->VPN. Enable VPN, and select L2TP Client as Protocol.
- Select Allow all devices or Ban all devices as Default Rule.
- Enable Site-to-Site to allow communication between VPN server and Clients.
-
Select VPN Policy.
- Disable: VPN Policy is disabled. No restriction.
- VPN kill switch: Internet access will be disconnected upon VPN disconnection. It is highly recommended for users who transmit data all through VPN. Preferred (and optionally Alternate DNS) is required.
- Domain: Select and configure to allow specified domain(s) to transmit data through VPN or not. DNS and Domain are required.
- Remote Subnet: Select and configure to allow devices with the specified subnet to transmit data through VPN. IP address and Subnet mask are required.
-
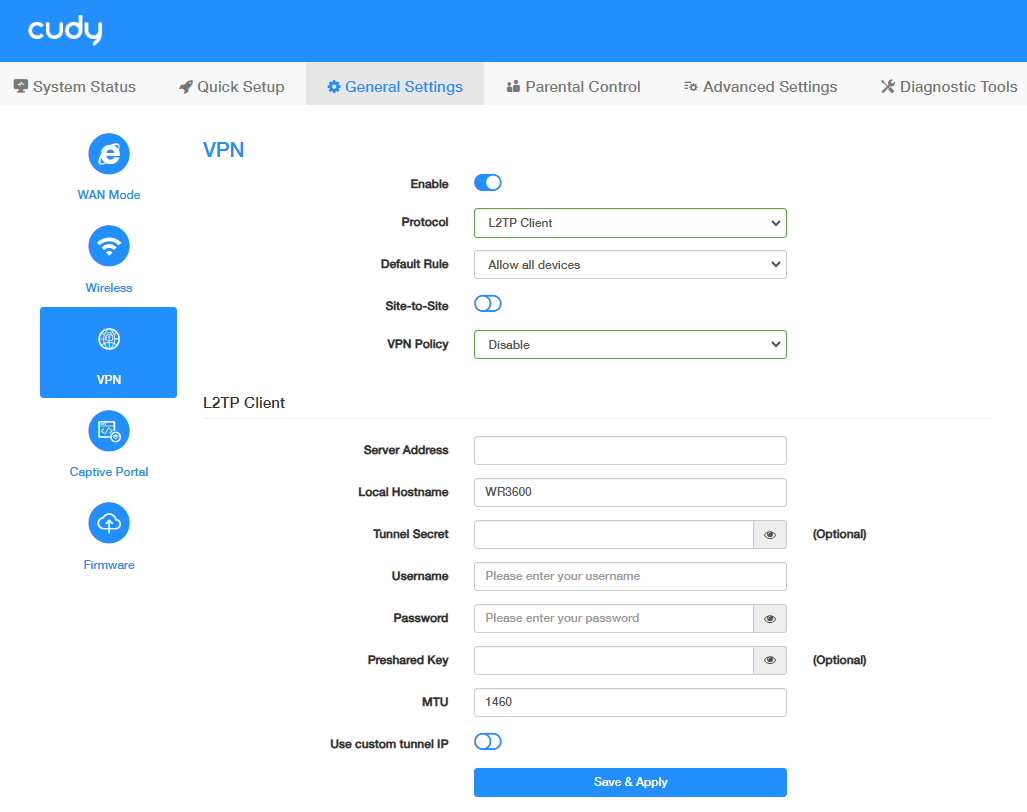
Configure the L2TP Client:
- Server Address/ Username/Password: Enter the parameters provided by the PPTP Server.
- Local Hostname: Customize or keep it as default.
- Tunnel Secret / Preshared Key: Enter the encryption if the L2TP Server has set it.
- MTU: Maximum Transmission Unit is 1400 by default, you may change it if necessary.
- Use custom tunnel IP: Enable and enter it if the L2TP Server provides a tunnel IP bound with the account.
-
Click Save & Apply.
OpenVPN
OpenVPN Server is used to create an OpenVPN connection for remote devices to access your home network. OpenVPN server requires a public IP. You can confirm whether the router has a public IP on the router management page System Status -> WAN -> More details -> Status. If the public IP displayed is consistent with the IP address of the router's WAN port, it means that the router has a public IP. Please follow the steps below to set up an OpenVPN connection.
STEP 1. Configure the OpenVPN Server on Router A:
- Log into the Router A’s management web page https://cudy.net (or 192.168.10.1).
- Go to General Settings ->VPN. Enable VPN, and select OpenVPN Server as Protocol.
- Select the Client Access (Internet and Local Network / Internet / Local Network).
-
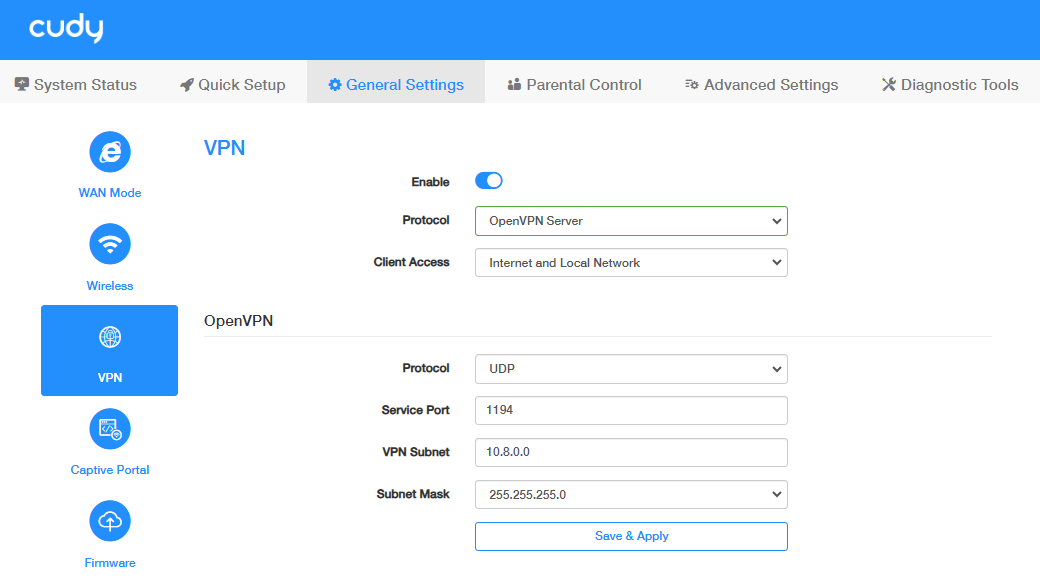
Configure the OpenVPN Server.
- OpenVPN Protocol: Select UDP or TCP as desired.
- Service Port: 1194 by defalut, keep it or change it as needed.
- VPN Subnet: Set up a VPN subnet segment.
- Subnet Mask: Select or customize as needed.
-
Click Save & Apply.
- Click EXPORT to export the configuration file, for the OpenVPN Client to upload.
STEP 2. Configure OpenVPN Client on Router B:
- Log into the Router A’s management web page https://cudy.net (or 192.168.10.1).
- Go to General Settings ->VPN. Enable VPN, and select OpenVPN Client as Protocol.
- Select Allow all devices or Ban all devices as Default Rule.
- Enable Site-to-Site to allow communication between VPN server and Clients.
-
Select VPN Policy.
- Disable: VPN Policy is disabled. No restriction.
- VPN kill switch: Internet access will be disconnected upon VPN disconnection. It is highly recommended for users who transmit data all through VPN. Preferred (and optionally Alternate DNS) is required.
- Domain: Select and configure to allow specified domain(s) to transmit data through VPN or not. DNS and Domain are required.
- Remote Subnet: Select and configure to allow devices with the specified subnet to transmit data through VPN. IP address and Subnet mask are required.
-
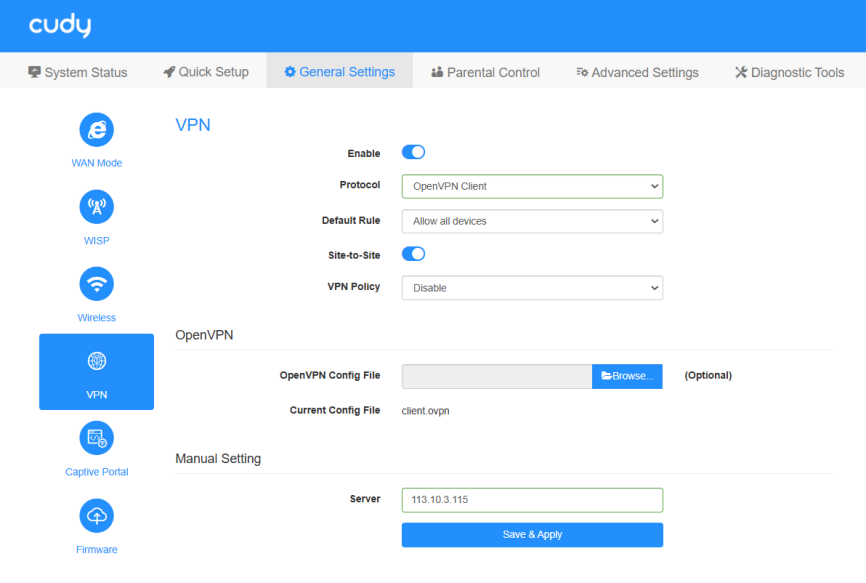
Click Browse... to locate the Configuration file (client.ovpn) you exported previously from the OpenVPN Server. The uploaded configuration file will be automatically read and the Server IP will be displayed.
- Click Save & Apply.
WireGuard VPN
WireGuard VPN Server is used to create a Wire Guard VPN connection for remote devices to access your home network. WireGuard VPN server requires a public IP. You can confirm whether the router has a public IP on the router management page System Status -> WAN -> More details -> Status. If the public IP displayed is consistent with the IP address of the router's WAN port, it means that the router has a public IP. Please follow the steps below to set up a WireGuard VPN connection.

STEP 1. Configure the WireGuard Server on Router A:
- Log into the Router A’s management web page https://cudy.net (or 192.168.10.1).
- Go to General Settings ->VPN. Enable VPN, and select WireGuard Server as Protocol.
- Select Client Access (Internet and Local Network / Internet / Local Network).
-
Configure the WireGuard Server:
- IP Address: 10.10.10.1 by default. You may change it if necessary.
- Listen Port: 51820 by default. You may change it if necessary.
- MTU: Maximum Transmission Unit is 1400 by default. You may change it if necessary.
-
Click Save & Apply. Then you will be required to configure the Client parameters.
-
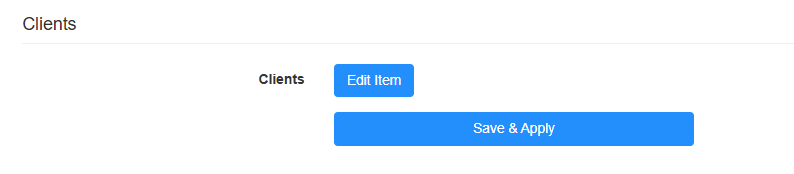
Click Edit Items to add entries. Enter the required parameters and then click Save.
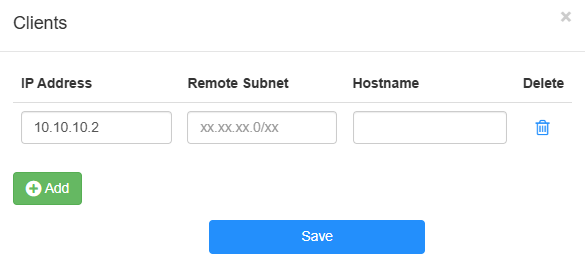
- IP Address: Enter the Client IP address.
- Remote Subnet: Enter the Client Subnet.
- Hostname: Customize the client hostname.
- Delete: Click to delete as needed.
-
Click to export the configuration file, and then upload it on the client for VPN connection.

STEP 2. Configure WireGuard Client on Router B:
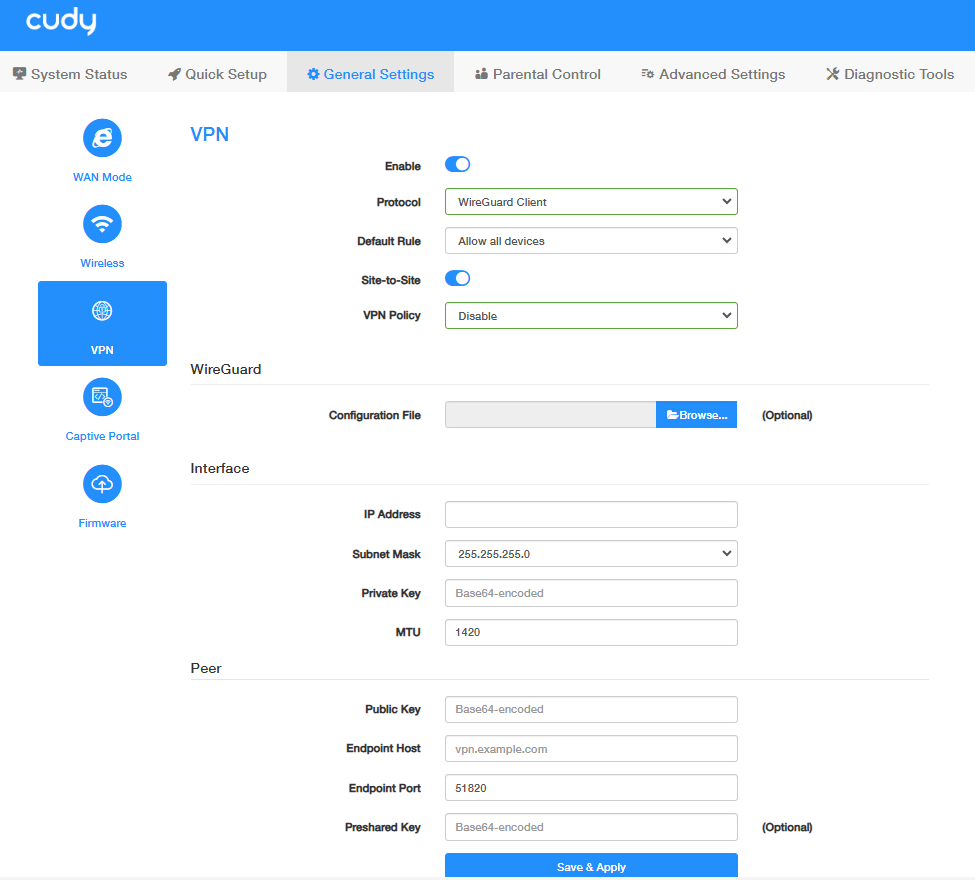
- Log into the Router A’s management web page https://cudy.net (or 192.168.10.1).
- Go to General Settings ->VPN. Enable VPN, and select WireGuard Client as Protocol.
- Select Allow all devices or Ban all devices as Default Rule.
- Enable Site-to-Site to allow communication between VPN server and Clients.
-
Select VPN Policy.
- Disable: VPN Policy is disabled. No restriction.
- VPN kill switch: Internet access will be disconnected upon VPN disconnection. It is highly recommended for users who transmit data all through VPN. Preferred (and optionally Alternate DNS) is required.
- Domain: Select and configure to allow specified domain(s) to transmit data through VPN or not. DNS and Domain are required.
- Remote Subnet: Select and configure to allow devices with the specified subnet to transmit data through VPN. IP address and Subnet mask are required.
-
Click Browse... to locate the Configuration file (wg-client-x.conf) you exported previously from the WireGuard Server. The uploaded configuration file will be automatically read and such parameters as below will be displayed.
- Confirm the parameters and then click Save & Apply.
ZeroTier VPN
Zerotier is a third-party cloud platform for VPN connections. It can establish a VPN connection without any public IP address node to achieve secure and remote access. It is free for use with less than 50 nodes. It is simple and convenient to set up. Please follow the steps below to set up a ZeroTier VPN connection.
STEP 1. Register for a ZeroTier Account and Obtain a Network ID.
-
Visit Zerotier website http://my.zerotier.com/, sign up for an account and log in.
-
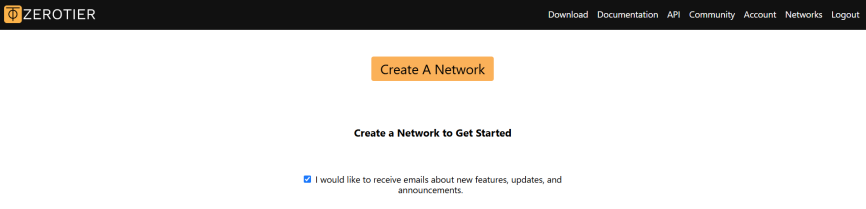
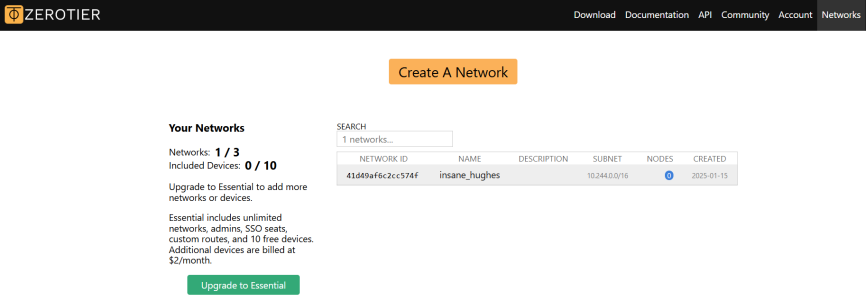
Click Network - > Create A Network.
-
Zerotier will create a new network and assign a NETWORK ID for you. Then click on the assigned NETWORK ID, and its setting page will display.
-
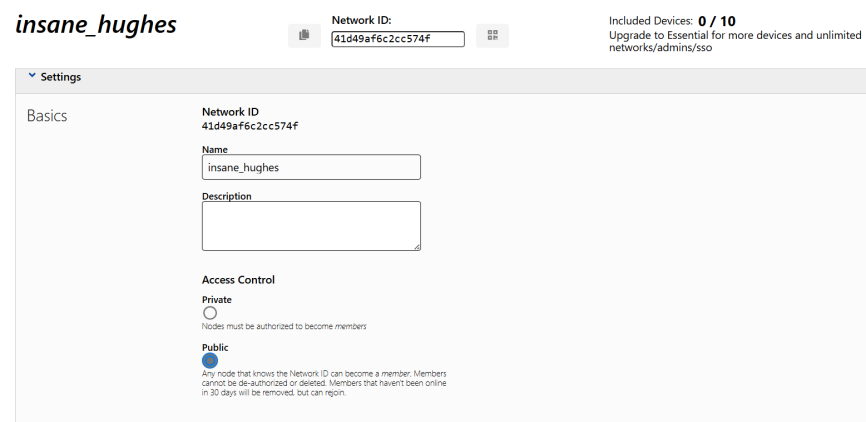
Set Access Control to be Public for later convenient settings, and note down the Network ID.
Note
Private Access Control requires authorization for the terminal or router to access the network, which is more secure but inconvenient. While Public Access Control allows for a direct the network access with authentication rather than authorization. You may choose either one accordingly.
STEP 2. Configure ZeroTier Master on Router A.
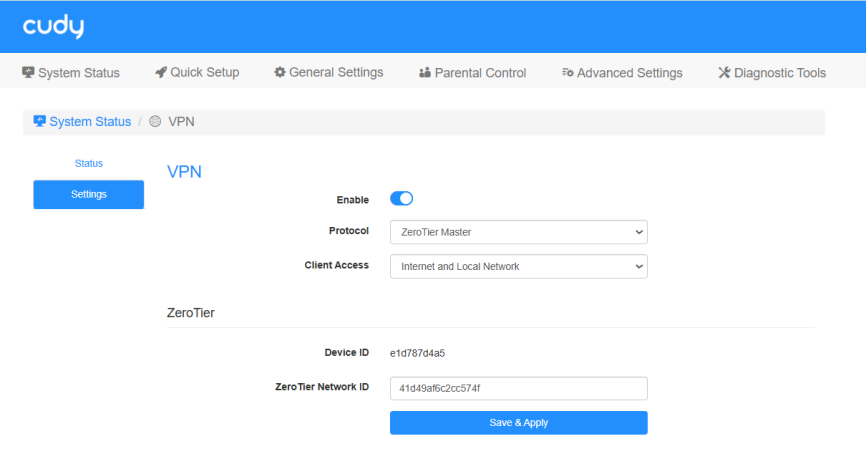
- Log into the Router A’s management web page https://cudy.net (or 192.168.10.1).
- Go to General Settings ->VPN. Enable VPN, and select ZeroTier Master as Protocol.
- Select Client Access (Internet and Local Network/Internet/Local Network).
- Enter the ZeroTier Network ID noted down previously.
- Click Save & Apply. Then it will display the Device ID.
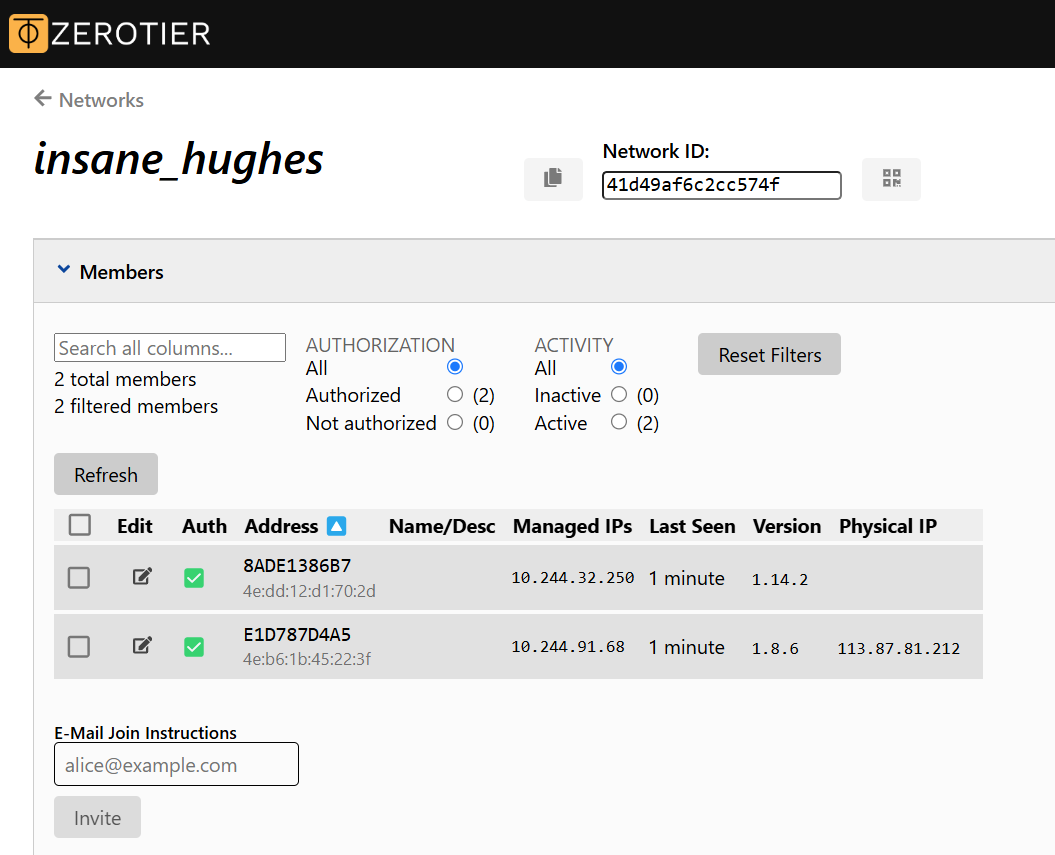
- Back to the ZeroTier web page, you will see One device has joined this network.

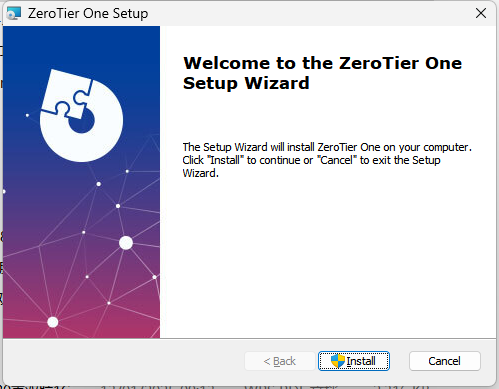
STEP 3. Join ZeroTier Network on your device.
-
Download and Install ZeroTier Software from https://www.zerotier.com/download/.
-
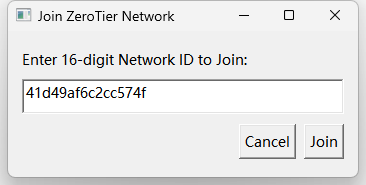
Click the ZeroTier icon and then Join New Network..., enter the Network ID and click Join.
-
Back to the ZeroTier web page, you will see this new device and its Managed IP.
STEP 4. Configure the Static Route.
Go to Settings -> Advanced on the ZeroTier web page. Under Add Routes, enter Router’s LAN IP segment 192.168.10.0/24 in Destination field and its Managed IP in Via field, and then click Submit.
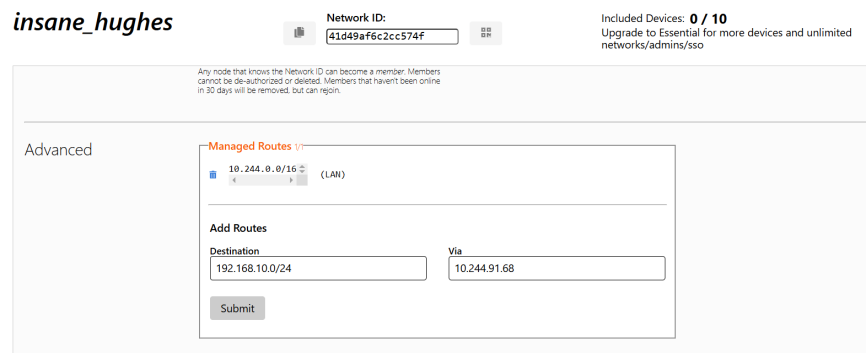
Now your client devices can directly access the router's management web page via 192.168.10.1 as well as the server via its IP address.
IPSec (site-to-site) VPN
IPSec (site-to-site) VPN is a secure tunneling protocol used to connect two different networks, typically a corporate network and a remote branch office network, over the Internet. It allows multiple users at the remote site to access resources on the main office network as if they were directly connected to it. Please follow the steps below to set up an IPSec (site-to-site) VPN connection.
STEP 1. Get both Routers in the Headquarter and Branch Office ready.
- Make sure both Routers are connected to the Internet, but two network can not be in the same LAN segment. For example, if the headquarter is in the LAN segment 192.168.10.0/24, then the branches should be in a different LAN segment, say, 192.168.20.0/24.
- Check and note down the WAN and LAN IP addresses of the Headquarter Router and Branch Office Router on their management Status page. WAN IP of the headquarters router is the remote gateway of the branch offices, and its LAN IP is the remote subnet of the branch offices; and vice versa.
STEP 2: Configure the IPSec VPN on the Router in the Headquarter.
- Log into the Router A’s management web page https://cudy.net (or 192.168.10.1).
- Go to General Settings ->VPN. Enable VPN, and select IPSec (site-to-site) as Protocol.
- Click Add to add IPSec Policies.
IPSec-Policy Settings
- Policy Name: Name the policy as desired.
- Remote Gateway: Enter the WAN IP of the Router in branch office.
- Local Subnet: Auto-filled the LAN segment of the local router.
- Remote Subnet: Enter the LAN segment of the Router in branch office.
- Preshared key: Set an encryption key as desired.
Dead Peer Detection
- Dead Peer Detection: Enable to detect whether the peer end is alive or not;
- Check Interval: Keep 30 seconds as default or change as needed;
- DPD Timeout: Set when to perform PDP checking again. Keep 2 Minutes as default or change it as needed.
-
DPD Action: Decide what to do after DPD detection failure, Restart, Hold or Clear. It is recommended to keep Restart as default.
-
Click Save & Apply.
STEP 3: Configure the IPSec VPN on the Router in the Branch Office.
1.Log into the Router A’s management web page https://cudy.net (or 192.168.10.1).
2.Go to General Settings ->VPN. Enable VPN, and select IPSec (site-to-site) as Protocol.
3.Click Add to add IPSec Policies.
IPSec-Policy Settings
- Policy Name: Name the policy as desired.
- Remote Gateway: Enter the WAN IP of the Router in the Headquarter.
- Local Subnet: Auto-filled the LAN segment of the local router.
- Remote Subnet: Enter the LAN segment of the Router in the Headquarter.
- Preshared key: Enter the encryption key set on the headquarter Router.
Dead Peer Detection: Set all the settings, including Dead Peer Detection, Check Interval, DPD Timeout, DPD Action, the same as the headquarter Router.
4.Click Save & Apply.
Then, you can go confirm the connection between Headquarter Router and Branch Router.
Note
If one of the routers does not have a public IP address, for instance the Branch Router, but the Headquarter Router has a public IP address, you can: - Set Branch Router in the Initiator Mode and change the Headquarter Router from Initiator Mode to Responder Mode. - Change the remote gateway on the Headquarter Router to be 0.0.0.0.